
Views: 286 Author: Site Editor Publish Time: 2025-08-27 Origin: Site


Precision matters when you cut a tapered recess in ductile iron casting. You work with a material that offers high strength, excellent wear resistance, and reliable durability. The right tools and techniques allow you to achieve clean results on ductile iron casting. Jinhong Shukong Machinery Casting Co., Ltd. provides quality materials that support your efforts. Always focus on safety and accuracy as you prepare for each step.
Use carbide-tipped tapered end mills for precise and durable cutting of ductile iron castings.
Prepare a clean, organized workspace and inspect the casting for defects before starting.
Mark the taper angle and depth carefully using proper measuring and scribing tools.
Secure the casting firmly and align tools precisely to maintain accuracy during cutting.
Control cutting speed, feed, and depth to protect tools and achieve a smooth finish.
Remove burrs after machining using the method that fits your project size and detail.
Wear proper safety gear like eye protection, gloves, masks, and steel-toed boots at all times.
Regularly check tools and machine setup to prevent errors and extend tool life.
When you work with ductile iron casting, you need the right tools to achieve precise results. Jinhong Shukong Machinery Casting Co., Ltd. offers the Iron Cast product line, which provides high-quality material for your projects. Using the correct tool ensures you can handle the strength and toughness of ductile iron casting.
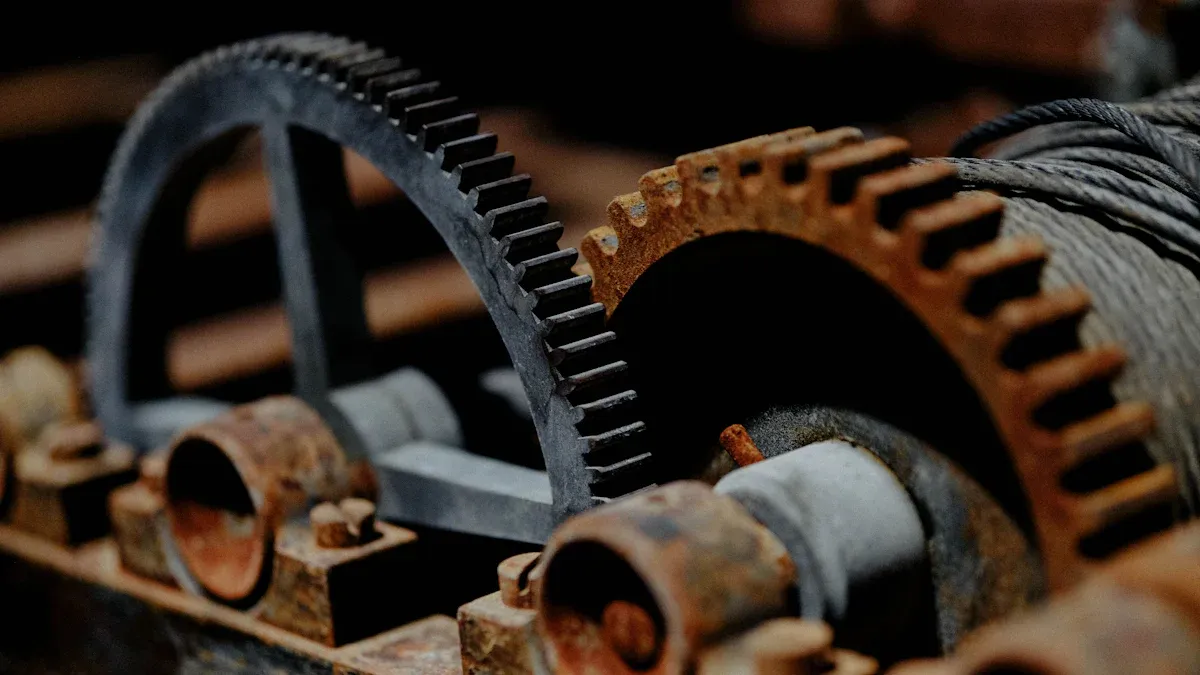
Milling is a common method for shaping and forming recesses in cast iron. You use a milling machine to remove material and create the desired shape. Carbide-tipped blades work best for this process because they last longer and handle the toughness of ductile iron. Always check your tool before you start. A sharp, well-maintained tool gives you a smoother finish and reduces rough spots. You should also use slower cutting speeds to prevent overheating. Applying coolant helps keep the blade in good condition and extends its life.
Tapered end mills are essential when you need to cut a tapered recess. These tools allow you to create precise angles and smooth surfaces. High-quality carbide or diamond-tipped end mills provide better accuracy and last longer. Regular inspection of your tool is important. Replace any dull or damaged tool right away to maintain accuracy and avoid machine downtime.
Calipers help you measure the width and depth of your recess. You use them to check your work as you go. This tool ensures your dimensions stay within the required tolerance.
Micrometers give you even more precise measurements. You use them to check the thickness and depth of the material after each pass. This tool helps you achieve the exact specifications needed for your project.
You must protect your eyes from flying chips and sparks. Always wear safety glasses or a face shield when you operate a machine. This simple step prevents serious injuries.
Heat-resistant gloves protect your hands from sharp edges and hot surfaces. Choose gloves that fit well and allow you to handle tools safely. In addition, consider wearing heat-resistant garments and steel-toe shoes for extra protection. Respirators or masks help you avoid inhaling dust or fumes during cutting.
Tip: Always organize your tools and safety gear before you begin. A clean, well-prepared workspace helps you work more efficiently and safely.
Before you start cutting, you need to set up your workspace and inspect your ductile iron casting. Careful preparation helps you achieve a precise and clean tapered recess. Follow these steps to make sure your project begins with a strong foundation.
Start by clearing your workbench. Remove dust, chips, and any leftover materials from previous jobs. A clean area keeps your tools and casting free from contamination. You want to avoid any particles that could scratch or damage the surface of your solid block. Use a brush or vacuum to pick up small debris. Wipe down the surface with a damp cloth to catch fine dust. A spotless workspace helps you focus and reduces the risk of accidents.
Lay out all your tools before you begin. Place your measuring devices, cutting tools, and safety gear within easy reach. Arrange them in a logical order, so you can move from one step to the next without searching for equipment. When you keep your tools organized, you save time and avoid mistakes. You also protect your solid block from accidental drops or scratches.
Tip: Use a checklist to make sure you have every tool you need. This simple step prevents delays and keeps your workflow smooth.
Before you inspect your ductile iron casting, clean its surface thoroughly. Use a wire brush or a soft cloth to remove any loose particles, oil, or rust. Pay special attention to corners and edges of the solid block, where debris can hide. A clean surface lets you spot defects more easily and ensures your markings stay visible during cutting.
Inspect the casting for visible flaws. Look for cracks, pits, or unusual color changes on the surface of the solid block. These signs may point to deeper problems inside the material. Surface defects like porosity and graphite flotation can weaken the area you plan to machine. Porosity appears as tiny holes and can lower the fatigue strength of the solid, making the machined recess less reliable. Sometimes, defects hide below the surface and only show up after you start cutting. Subsurface porosity, often caused by trapped gas or inclusions, can lead to irregularities and even scrap parts. If you find any defects, set the block aside and choose another solid block for your project.
A defect-free, clean solid block gives you the best chance for a high-quality machined recess. Careful inspection at this stage saves you time and prevents wasted effort later.
Before you start cutting, you need to mark the exact location and shape of the tapered recess on your ductile iron casting. Careful marking helps you achieve the correct angle and depth for the tapered portion, ensuring your finished work meets precise specifications.
You must first determine the correct angle for your taper. Use a protractor or an adjustable angle gauge to measure and set the required taper angle. Place the tool on the casting and adjust it until you reach the desired angle. Double-check your measurement to avoid mistakes. If your design calls for a specific degree, write it down and keep it visible at your workspace. This step ensures that the tapered recess matches your project’s requirements.
After you set the angle, measure the depth of the recess. Use a depth gauge or calipers to find the exact measurement from the surface to the bottom of the tapered area. Mark this depth clearly on the casting. You can use a fine-tip marker or a scribe to draw a line at the correct depth. This line guides you during the cutting process and helps you avoid cutting too deep or too shallow.
To make your layout lines stand out, apply a thin, even coat of blue layout dye to the area where you will scribe. The dye dries quickly and creates a strong contrast, making your lines easy to see. Wait for the dye to dry completely before moving to the next step. This preparation helps you avoid mistakes and keeps your markings clear throughout the process.
Use a precision scribe or a vernier height gauge with an attached scriber to draw your layout lines. Place your casting on a flat, stable surface plate for the most accurate results. Draw the lines for the taper and the boundaries of the tapered recess. For extra accuracy, use a prick punch with a sharp point to mark intersections or important points along your lines. If you need to mark the center of a circle or a drill point, use a center punch to create a small indentation. This prevents your drill bit from wandering and keeps your work precise.
Tip: Always keep your measuring and scribing tools clean and in good condition. Well-maintained tools help you achieve precision within tight tolerances, often up to ±0.001 inches.
By following these steps, you set yourself up for success when cutting the tapered recess. Careful marking and scribing ensure that your finished product meets both visual and dimensional standards.
Creating a precise tapered recess in ductile iron casting requires careful setup and attention to detail. You must follow each step closely to achieve the best results, especially when working with high-quality materials like those from Jinhong Shukong Machinery Casting Co., Ltd.
You need to secure the casting before you start any cutting operation. Use a fixture or vise designed for irregular castings. This keeps the workpiece stable and prevents movement during machining. Always align the casting using a probe or manual method to center it properly. If you use a cnc milling machine, double-check the clamping pressure to avoid distortion. Establish a reliable datum by machining initial features without moving the casting. This step helps you maintain accuracy throughout the operation.
Proper tool alignment is essential for accurate taper work. Set the boring tool exactly on the center axis of the workpiece. This prevents errors in the tapered recess. Remove any backlash in the taper attachment before you begin. Backlash can cause a straight section before the taper starts, which affects the final result. Make sure the tool size is small enough to pass through the smallest part of the taper without rubbing. Use a dial indicator and test bar to fine-tune the setup. Perform a trial cut and measure the taper for uniformity. Adjust the setup as needed before final machining. Always check the finished taper with a straight edge to detect any deviations.
Tip: Avoid moving the part between operations. This helps you keep the highest level of accuracy.
Selecting the right speed and feed is critical for ductile iron. Use carbide tooling for the best results. The optimal cutting speed is about 250 SFM. Feed per tooth depends on the tool diameter. Refer to the table below for guidance:
| Tool Diameter (inch) | Feed per Tooth (inch) |
|---|---|
| 3/32 to 1/8 | 0.0005 |
| 5/32 to 3/16 | 0.0007 |
| 7/32 to 1/4 | 0.0015 |
| 5/16 to 3/8 | 0.002 |
| 7/16 to 1/2 | 0.003 |
| 9/16 to 5/8 | 0.004 |
| 11/16 to 3/4 | 0.005 |
| 7/8 to 1 | 0.006 |
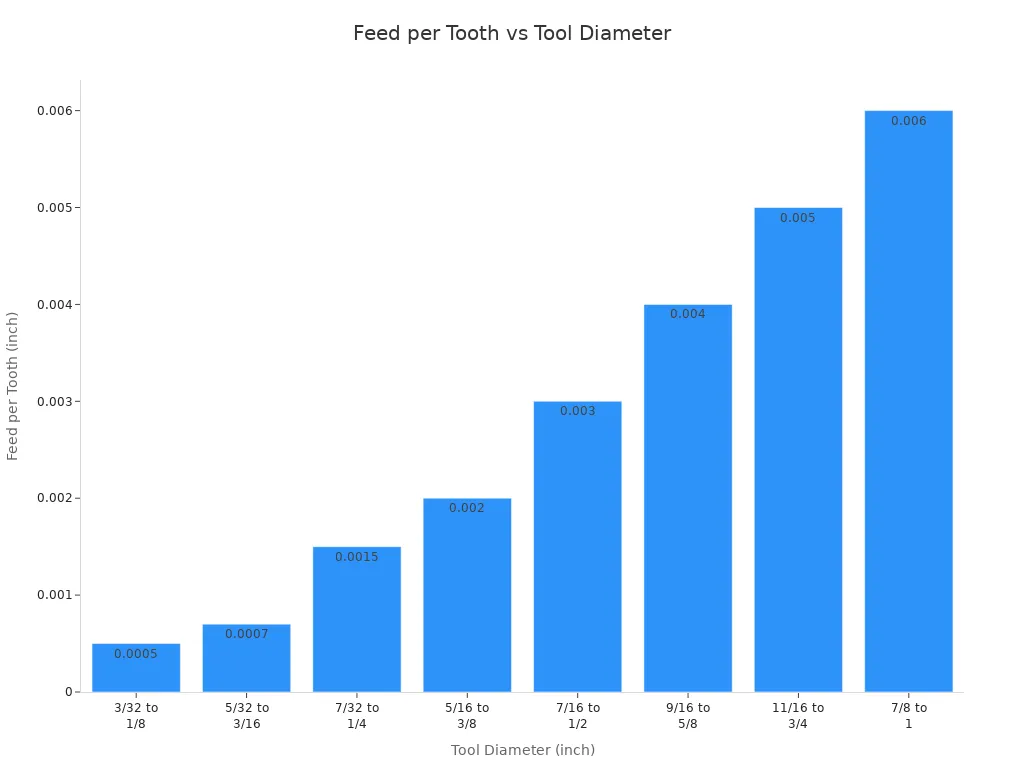
When you use a tapered end mill, calculate the RPM using the larger diameter. Set the feed per tooth based on the tip diameter. For pocket machining, reduce the feed slightly to improve the surface finish. Always perform at least one spring pass to achieve a uniform level and avoid steps in the pocket.
Control the depth of each pass to prevent tool overload and ensure a smooth finish. Use calipers or a micrometer to check the depth after each pass. Make shallow cuts, especially at the start of the cutting operation. This method helps you avoid tool breakage and keeps the surface clean. If you use a cnc machine, program the depth increments carefully. Always monitor the tool and machine for unusual sounds or vibrations.
Note: Adjust your cutting parameters if you notice any irregularities in the casting. This protects your tool and ensures a precise result.
Tapered gibs play a vital role in maintaining precision during machining. You install a tapered gib to match the gib recess taper with extremely tight tolerances. This fit is often within a thousandth of an inch. The tapered gib allows you to make fine adjustments, eliminating any looseness or play in the machine components. You can use a gib making fixture to produce the correct shape and size. Most machinists create tapered gibs from cast iron using a shaper or planer. Hand scraping and careful fitting ensure the gib matches the machine perfectly.
Using a tapered gib offers several advantages. It ensures smooth movement and accurate positioning of machine parts. This precision is especially important when machining ductile iron castings, where even a small error can affect the final product. Tapered gibs help you maintain accuracy throughout the operation. They also reduce wear on the machine and improve the quality of the finished recess. When you use a properly fitted tapered gib, you support the entire cutting process and achieve professional results.
Callout: Always check the fit of the tapered gib before starting any cnc or lathe operation. A well-fitted gib is key to precision and long-term machine performance.
After you finish cutting the tapered recess, you need to focus on the final steps. These steps help you achieve a professional result and ensure your ductile iron casting meets all requirements. You will work with the solid block to remove burrs, check the surface, and clean away any residue.
Burrs often form along the edges of the recess after machining. Removing these burrs is important for both safety and function. You have several effective methods for deburring ductile iron castings. The table below shows common techniques and their advantages:
| Deburring Method | Description | Advantages for Ductile Iron Castings |
|---|---|---|
| Electrochemical Deburring | Uses electricity and chemicals to dissolve burrs, even in hard-to-reach areas. | High precision, minimal damage, great for complex parts. |
| Mechanical Deburring | Machines remove burrs quickly and efficiently. | Good for large, accessible burrs on the solid block. |
| Mass Finishing | Uses abrasives to finish many parts at once. | Efficient for large volumes of solid castings. |
| Manual Deburring | Hand tools scrape off burrs for delicate or small-scale work. | Useful for detailed finishing on the solid block. |
| Waterjet Deburring | High-pressure water jets erode burrs without harming the casting. | Precise and non-damaging for ductile iron surfaces. |
You should choose the method that fits your project size and the complexity of your solid block. For small or detailed work, manual deburring gives you control. For larger batches, mass finishing or mechanical deburring saves time.
Tip: Always inspect the block after deburring to make sure no sharp edges remain.
You must check the surface of your solid block to confirm it meets industry standards. For ductile iron castings, the surface should be free from defects like cracks, scale, or adhering sand. Visual and tactile inspection works best for as-cast surfaces. You can use your fingers to feel for rough spots or irregularities. If your project requires a specific surface finish, you should agree on the requirements with your supplier before starting.
Industry standards, such as ASTM A 834, require that the solid casting passes a visual examination. You may also use extra inspection methods, like magnetic particle or liquid penetrant testing, if your order specifies them. Always verify that the machined recess matches the required dimensions and tolerances. Use calipers or micrometers to check the depth and angle of the recess in your solid block.
Note: Do not rely on single profilometer readings for as-cast surfaces. Visual and tactile checks provide a more accurate assessment.
After you finish deburring and inspecting the surface, you need to clean the solid block. Use a brush or compressed air to remove metal shavings and dust. Wipe the block with a clean, dry cloth to remove any remaining residue. This step prevents contamination and prepares the solid block for assembly or further processing.
A clean block ensures that no debris interferes with the fit or function of the finished part. Always double-check the recess and surrounding areas for hidden particles. Proper cleaning helps you deliver a high-quality, professional result every time.
You must protect yourself when machining ductile iron castings. Sharp chips, hot surfaces, and fine dust can cause injuries if you do not use the right personal protective equipment (PPE). Always wear safety glasses or goggles to shield your eyes from flying particles. A face shield adds extra protection, especially during heavy cutting. Gloves help prevent cuts and burns, but you should choose gloves that fit well and do not get caught in moving parts.
You also need to think about your hearing and breathing. Machining can be loud, so earplugs or earmuffs protect your hearing. Dust and coolant mist can irritate your lungs. Use a disposable face mask or a respirator to keep dust out of your airways. Many machinists wear N95 masks to block fine particles. Protective clothing, such as long sleeves and pants, keeps your skin safe from hot chips and sharp edges. Steel-toed boots protect your feet from dropped tools or castings.
Safety glasses or goggles for eye protection
Face shields for extra face coverage
Gloves for hand safety
Earplugs or earmuffs for hearing protection
N95 masks or respirators for dust and mist
Protective clothing to prevent skin contact
Steel-toed boots for foot safety
Tip: Always check your PPE before you start. Replace damaged gear right away.
You must know how to stop your machine quickly in case of an emergency. Every milling machine or lathe has an emergency stop button or switch. Learn where it is before you begin. Practice reaching it without looking. If something goes wrong, such as a tool breaking or a workpiece shifting, hit the emergency stop right away. This action can prevent injuries and damage.
Keep your hands away from moving parts. Never try to clear chips or adjust the workpiece while the machine runs. Use a brush or tool to remove chips after the spindle stops. Stay alert and focus on your task at all times.
Callout: Quick action saves lives. Always stay prepared for emergencies.
Machining ductile iron creates fine dust, especially graphite dust, which can cause health problems. You may notice coughing, sneezing, or flu-like symptoms after breathing in this dust. Some people develop allergies or skin irritation. The dust can pass through regular filters, so you need a good mask or respirator.
Ductile iron dust can irritate your lungs and cause flu-like symptoms.
Graphite dust is especially harmful because it is very fine.
Some people may have allergic reactions or skin problems.
Older or recycled castings may contain unknown metals, which can add risk.
Good ventilation and dust collection systems help keep the air clean.
Note: Always use proper ventilation and wear a mask when machining ductile iron. Clean your workspace often to reduce dust buildup.
When you machine a solid ductile iron block, you may face challenges that affect the quality of your work. Knowing how to spot and fix these issues helps you achieve a precise tapered recess and a smooth finish.
You can recognize tool wear by looking for dull cutting edges, increased vibration, and rough surfaces on your solid block. If you notice more heat or see chips changing color, your tool may be wearing out. Sometimes, you hear unusual noises or see the tool leave marks on the solid surface. These signs mean you should check your cutting tool before continuing.
The main causes of tool wear when machining ductile iron include:
| Cause of Tool Wear | Explanation |
|---|---|
| Hard Carbides | Hard carbides in ductile iron cause mechanical abrasion on the tool surface. |
| Abrasive Nature | Graphite nodules and the hard matrix increase abrasion during cutting. |
| Heat Generation | High temperatures during machining degrade tool material. |
| Vibrations and Chatter | Vibrations reduce tool life and affect surface finish. |
| High Cutting Forces | Strong ductile iron creates higher cutting forces, wearing tools faster. |
You can extend tool life by following these steps:
Use harder carbide grades or ceramic inserts for your solid block.
Apply coatings like TiN, AlTiN, or TiCN to protect against heat and wear.
Control cutting speed and feed rates to reduce tool stress.
Use proper lubricants and coolants to manage heat.
Keep your workspace clean by removing dust with vacuums or magnets.
Start with the hard outer layer of the block using conventional milling.
These actions help you keep your tools sharp and your solid block in top condition.
If your tapered recess does not match your design, several factors may be at play. Misaligned tools, loose clamping, or worn machine parts can cause the taper to be off. Incorrect cutting parameters or skipping measurements also lead to errors in your solid block.
To fix an inaccurate taper, check your machine setup first. Make sure the block is clamped tightly and the tool is aligned. Measure the angle and depth again before making another pass. Adjust your speed and feed if you see chatter or uneven cuts. Always use your measuring tools to confirm the taper matches your plan.
Tip: Double-check your setup before each cut to avoid repeating mistakes.
After machining, you may see surface defects on your solid block. Common problems include shift or mismatch, which happen when mold parts do not line up. Warping can also occur if the block cools unevenly.
You can solve these issues by:
Checking and correcting mold alignment before machining.
Using proper molding box and closing pins for a tight fit.
Applying normalizing heat treatment to remove stress and straighten the block.
These steps help you achieve a smooth, professional finish on every solid block you machine.
You achieve the best results in ductile iron machining by following each step with care. Start with a clean workspace, select the right tools, and always check your measurements. Safety gear protects you from harm. Choose high-quality castings like those from Jinhong Shukong Machinery Casting Co., Ltd. for reliable performance.
Cover machine ways and precision surfaces during machining.
Clean up immediately after finishing.
Maintain your equipment to prevent damage from abrasive dust.
Careful preparation and attention to detail help you create a precise, professional tapered recess every time.
You should use a carbide-tipped tapered end mill. This tool handles the strength of ductile iron and creates smooth, precise tapers. Always check the tool for sharpness before you start.
You can reduce tool wear by using coated carbide tools, applying coolant, and setting the correct speed and feed. Inspect your tools often. Replace them if you see signs of dullness or damage.
You need to check for cracks, pits, or other defects. A clean, defect-free casting ensures accurate machining and prevents wasted effort. Defects can cause tool damage or poor results.
You should wear safety glasses, gloves, and a dust mask. Ear protection and steel-toed boots add extra safety. Always check your gear before starting.
You must measure and mark the angle with a protractor or angle gauge. Use a scribe for clear lines. Double-check your setup before cutting to ensure accuracy.
Yes. Iron Cast ductile iron offers high strength and toughness. You can use it for parts that face complex stresses and demanding conditions.
Check your machine setup and tool alignment. Measure the angle and depth again. Adjust your settings and make another pass if needed. Always use your measuring tools for confirmation.
You can use manual deburring tools, mechanical methods, or waterjet deburring. Choose the method that fits your part size and detail. Always inspect the edges after deburring.


